Beginner level
My (your ?) aim
Build a personal blog with a xxx.github.io-format URL.
My (your ?) current status
I searched on the web and heard of words like GitHub pages, Jekyll, but… well, I still don’t know what they are exactly & how to use them. I’m not experienced in website building, but it’s actually quite very easy.
Now:
-
I’d like to know a bit more about GitHub Pages first: press here
-
I just want to create my blog now: step-by-step tuto
-
There is nothing I want here. I’m leaving.
About GitHub Pages
(It’s certainly not exhaustive, I just wrote about what I’ve looked at and selected the parts I found useful)
What’s GitHub Pages ?
I quote from GitHub Help:
[It] is a static site hosting service designed to host your […] pages directly from a GitHub repository.
There is a hard limit of 1GB:
The size of the published site should be < 1GB.
Can I have several GitHub pages ?
Just one with yourusername.github.io format.
But there can be project websites like yourusername.github.io/project1, yourusername.github.io/project2…
How to build my blog step-by-step ?
Note: This is just one way to make things work.
1. Create a specific GitHub repo
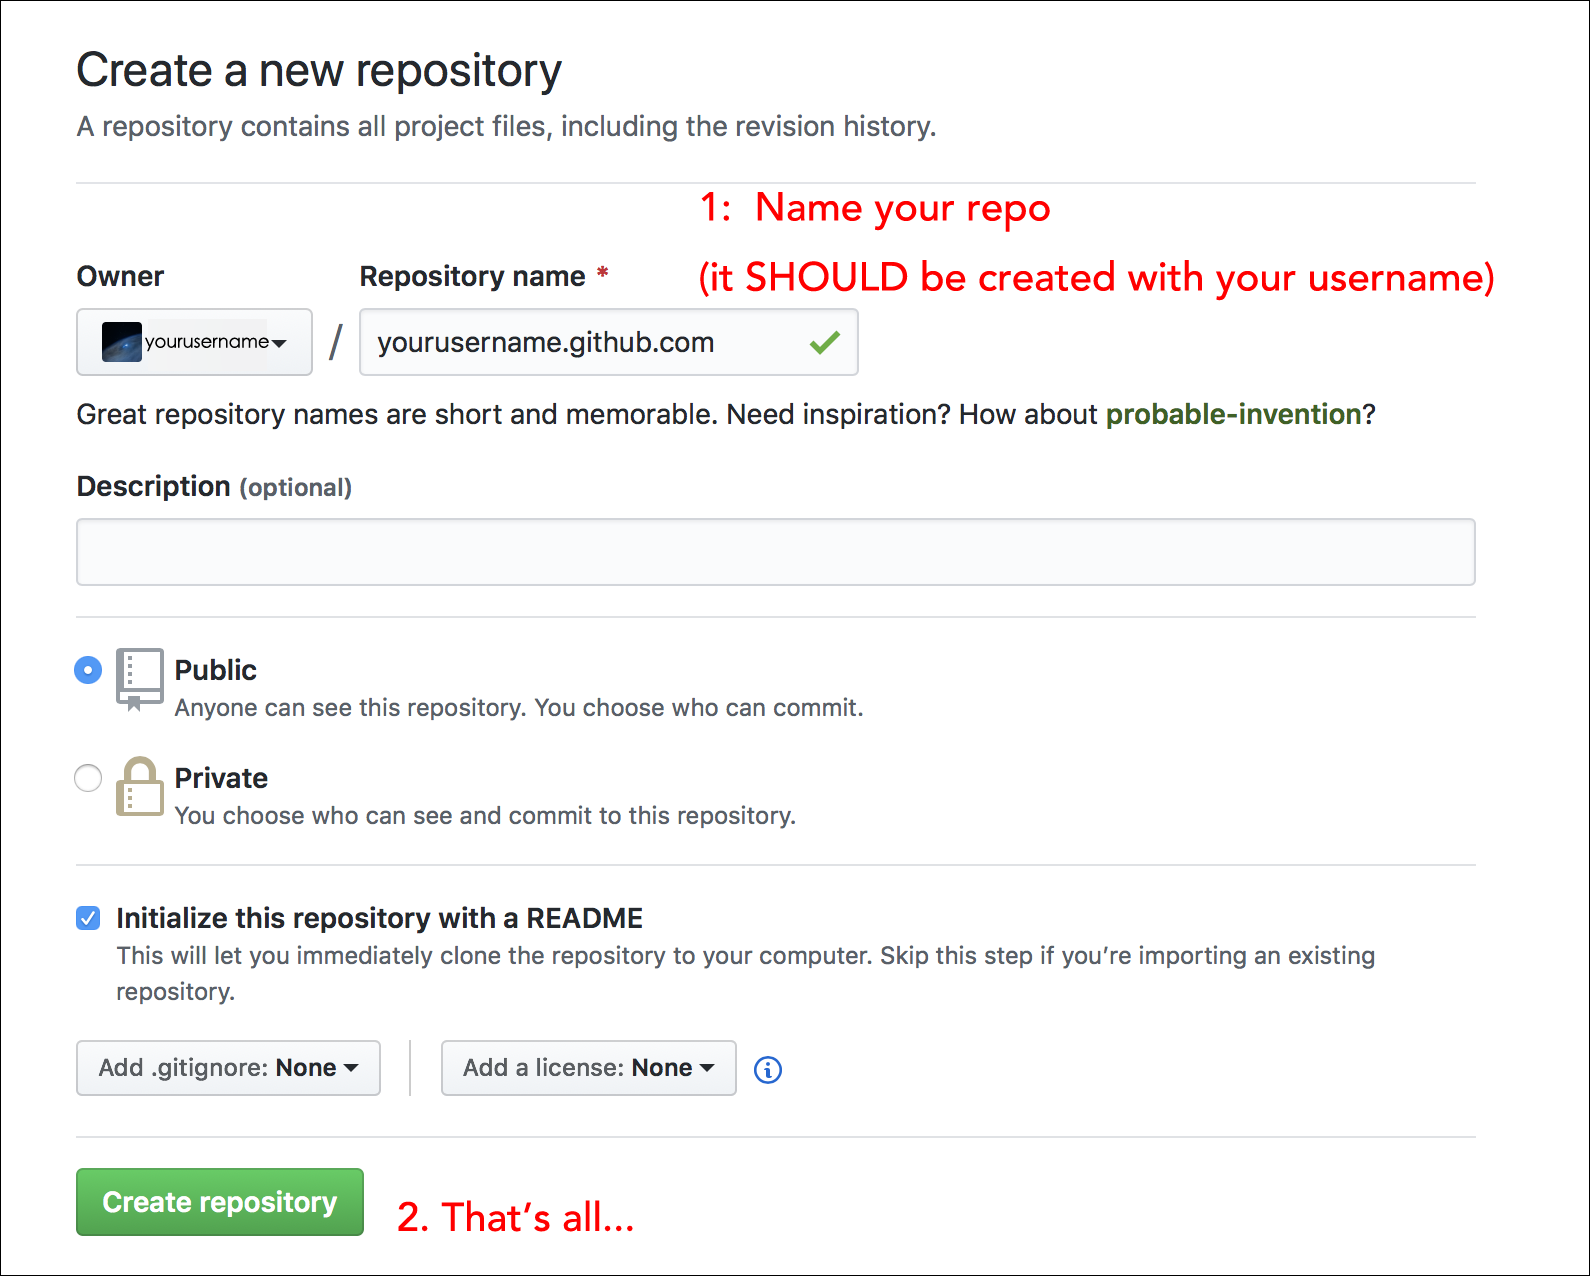
Notes:
-
You could actually use
yourusername.github.ioas repo name, I usedyourusername.github.comand it also works. - If your GitHub account is:
- Free: your repo of GitHub Pages should be public.
- Pro/Team/Enterprise Cloud/Enterprise Server: your repo can be public or private. More info here.
- If you want more info on: how to create a repo in GitHub.
2. Clone your repo to local folder
Using HTTPS:
git clone https://github.com/yourusername/yourusername.github.com.git
3. Install Jekyll + choose a theme
-
Install Jekyll + bundler
gem install jekyll bundlerIf you don’t have Ruby yet, here’s a detailed instruction.
-
Create the blog
-
If you want to create and use the basic template, you can:
jekyll new myblogname -
If you want to use a nice third-party template:
-
Choose a template
You can find plenty of nice free Jekyll templates by searching on GitHub, or you can have a look at Jekyll Themes website.
Actually I found that the default template is quite simple, and the one I’m using is TeXt, so I’ll take this one as example

-
Clone or download the theme repo.
-
Copy the files that you need to your
yourusername.github.comrepo.The folder structure is like this:
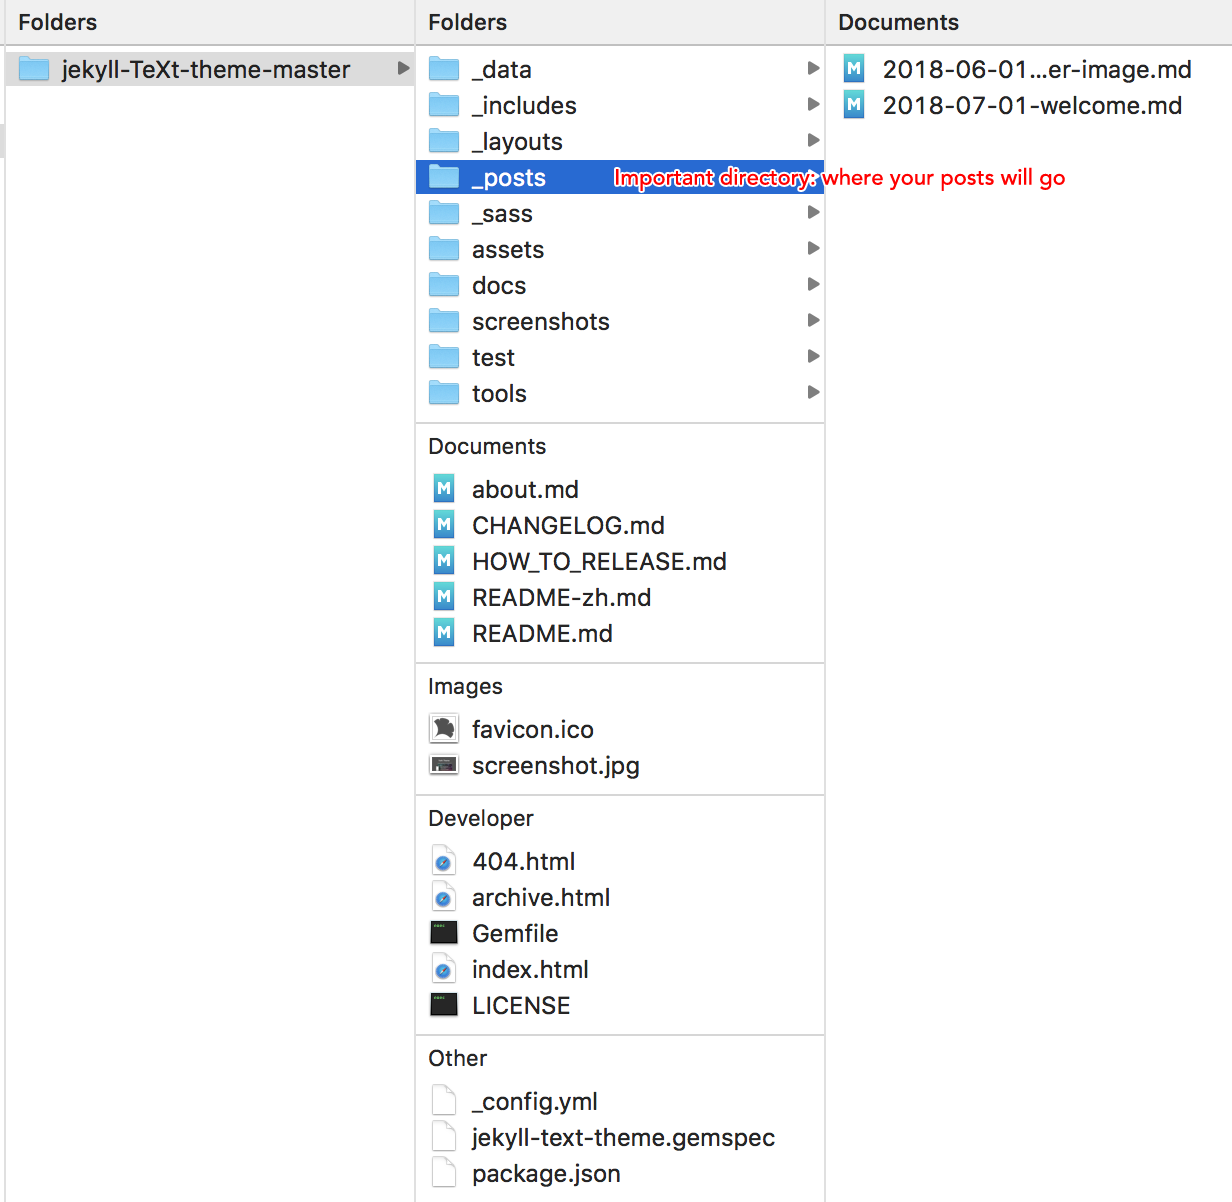
-
Folders such as
docs,screenshots,testare not needed for your blog to run. -
_postsis where your posts will be stocked. -
_layoutscontain the template of different pages that you could directly use.
If there is a license/notice to be included, please don’t forget to keep them

-
-
Run
bundle installto install the dependencies.
It’s now OK for the basic setup.
-
-
Write a new Post
-
Create a new file with a name formatted like
YEAR-MONTH-DATE-name-of-the-file.md.The template need a correctly formatted name to be able to recognize the infos.
-
Start to write…
An example of content:
--- layout: article title: Explain how to build a personal blog to my Snorlax tags: pseudo-tutorial-random --- Hello world !-
layoutcorresponds to the various layouts in the folder_layouts. -
titleis the title actually displayed.
-
-
That’s all.
-
-
Configure your profile
Just modify the parts you want in
./_config.yml. -
(Optional) Add a new Page
For instance, if I want a new Page named
Gallery.-
Create a file name
gallery.mdand save it in the main folder (or another one, you can change the configurations after if you want to).For instance, I can use the
articlelayout for this page:--- layout: article --- My gallery. -
Open the YAML file
./_data/navigation.ymland just add the name of your page, for instance:- titles: en : &EN Gallery en-GB : *EN en-US : *EN en-CA : *EN en-AU : *EN zh-Hans : &ZH_HANS 相簿 zh : *ZH_HANS zh-CN : *ZH_HANS zh-SG : *ZH_HANS zh-Hant : &ZH_HANT 圖片集 zh-TW : *ZH_HANT zh-HK : *ZH_HANT url: /gallery.html(Note: If you want to test, avoid calling your test page “test”.)
-
4. Test it in local
-
In your terminal:
jekyll serveIf you have an error (like me) saying that:
You have already activated addressable 2.6.0, but your Gemfile requires addressable 2.5.2. Prepending
bundle execto your command may solve this.Then:
bundle exec jekyll serve -
Open your browser and go to:
http://localhost:4000Normally you should see your website built.
5. Just push it
If you want more info on how to push to a repo using the command line.
After some time (not very long) you should be able to see what you’ve seen in local at yourusername.github.io ! ![]()
Hope that it helped ![]()